


|
SoCoder -> Article Home -> Basic Game Engines |
|
|
|
|
|
Jayenkai |
Tetris Part Two : PlayfieldA rather messy tutorial to help people make decent Tetris games. |
|
How to make a decent Tetris game. Part Two - Playfields and Solidity. This tutorial is half created to help Garand, but also because I'm sick of playing rubbish Tetris clones. You can find part one of this tutorial here. Everyone knows that "Gameboy Tetris" was the best one going, but no-one ever seems to make them like that anymore. So here's a list of things you'll need in order to make the game well, as well as chunks of code, and a few moans and gripes along the way. I'll be doing this in Blitz, but the rules are about the same for all languages, and you should be able to follow them along with whichever language you're using. (maybe! Although it is a bit of a mess! I'm not very good at describing code!) 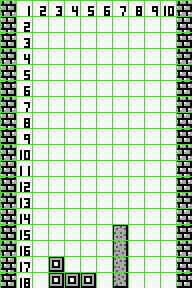 The Playing Field That's the size we're aiming for. A playing field 10 blocks across and 18 down. But to be sure we don't overstep the array's size and cause any memory errors, we'll make our actual area a little larger. Dim Grid(25,28) Our playfield will be from 5,5 to 14,22, with all the surrounding area being filled in, so we can't go outside the box. However, we'll have to empty the small area at the top, so the blocks can shift about above the playfield. That sets up our playing field. You might want to stick that in a function, or something, so you can use it to reset the game whenever you need to. To draw out playfield, we use another simple loop. We'll start off only drawing Grid(x,y)=1 so draw yourself a nice brick tile, and get it loaded in as iBrick. Then inside the loop, your decision. You can either draw the whole screen (since we have a 25x28 array, you can fill the screen) or just the area around the playfield. That's just the playfield area, along with a line of bricks on the left and right, and the one at the bottom. For now we've just drawn bricks where Grid=1, but in the future we'll also want to draw all our landed block tiles in there, too. Start off the PlayerX and Y co-ords as 10 and 5, so the start point should be at the top center of our playfield, and give it a go. You should have a nice tetris block inside the area. Now, we don't want the player shifting the block around up and down, so remove the two keyhit(200) and keyhit(208) lines from the code. Add two extra variables, DropSpeed and DropDelay. Set DropSpeed to 30. This is the speed we drop, ie Every 30 frames, we drop the PlayerY by 1. DropDelay will keep counting up. If it gets above DropSpeed, we reset it to 0, and then do the actual drop. If the player holds the down key, we want to drop a bit faster, but rather than just "Plummet" the block like stupid tetris games do, we'll instead just speed up the DropDelay. If you give that a go, you should feel a decent Tetris game emerging. Of course, we've not added any landing to the game, yet, so we'll do that next. Landing Hopefully all your variables are globals. If you forgot, like I did, go and fix it before you carry on. This bits relatively easy. For the most part, all we have to do is check there's nothing below each tile of the block. A function's the easiest way to do this. Run through each tile, and if grid(x,y+1)>0, return true. That's our test. For basic Tetris, just dump that in, check for landing, and set the block down whenever it's landed. We set the grid to be equal to the (Block# *100) and then add which tile. This way, we can head back into the drawing routine, and keep track of what color the tiles are. If you try that out, and keep hold of the Down button, you'll find the next block automatically flies down the screen once a block has landed. To stop that from happening, we'll put a "Let Go" flag on the controls once a block has landed. Make LetGo a global. Where the block lands, add LetGo=1, and around most of the KeyHit/KeyDown things, add And LetGo=0 In addition, stick in an extra line, stating that if no key's held, LetGo=0 Nice and easy, right! Cool, lets add the line checks! Line Checks Under the bit where the block lands, just after LetGo=1, add in CheckForLines=1. Also add it as a global up at the top. Add a new section.. if CheckForLines=1 ... endif Inside here, we'll do a quick check of lines 5->22, seeing if any are full right across. If they are, we'll make them disappear and then drop all the rest of the lines. Right at the top of the section, set CheckforLines back to 0 so we don't keep repeating the thing over and over. Next set DropLines to 0, too. (and add it as a global up top.) Shuffle through each line. If each point in the line is full, set the line to a different color, and set DropLines to 1. We'll set each changing gridpoint to 2, and then when we redraw the grid we can see a change. Create a new all-round "Vanishing Tile" graphic (32x32) and load it in as iDropMe. Don't forget to change the drawing code to draw iDropMe wherever there's a 2. If you run that as it is, it should find a line, but it won't drop anything afterwards, so we'll have to fix that next. Rather than instantly dropping the lines, though, we'll stick on a 15 frame delay. So, instead of having if DropLines=1, we use if DropLines>0. Then we add 1 to DropLines, and if it hits 15, that's when we do the actual drop. Now, head into the code, neaten things up a bit, and stop any movement from happening whilst DropLines>0 or CheckForLines>0. Nice and easy to tweak everything into action. You might also want to throw in a nice background image, and maybe even shuffle the functions around a bit, so they're easier to trigger at various points from the menu. Download things up to this point At this point, everything should be working nicely, except for one major flaw. That being the whole "You can move left and right into other objects" thing. We'll be dealing with that in Part 3, or you could have a fiddle with it yourself and see what you come up with. |
|
|
|
|
Comments |
|
|
| |||
|
| ||||