

|
SoCoder -> Article Home -> Basic Game Engines |
|
|
|
|
|
Jayenkai |
Tetris Part One : BlocksA rather messy tutorial to help people make decent Tetris games. |
|
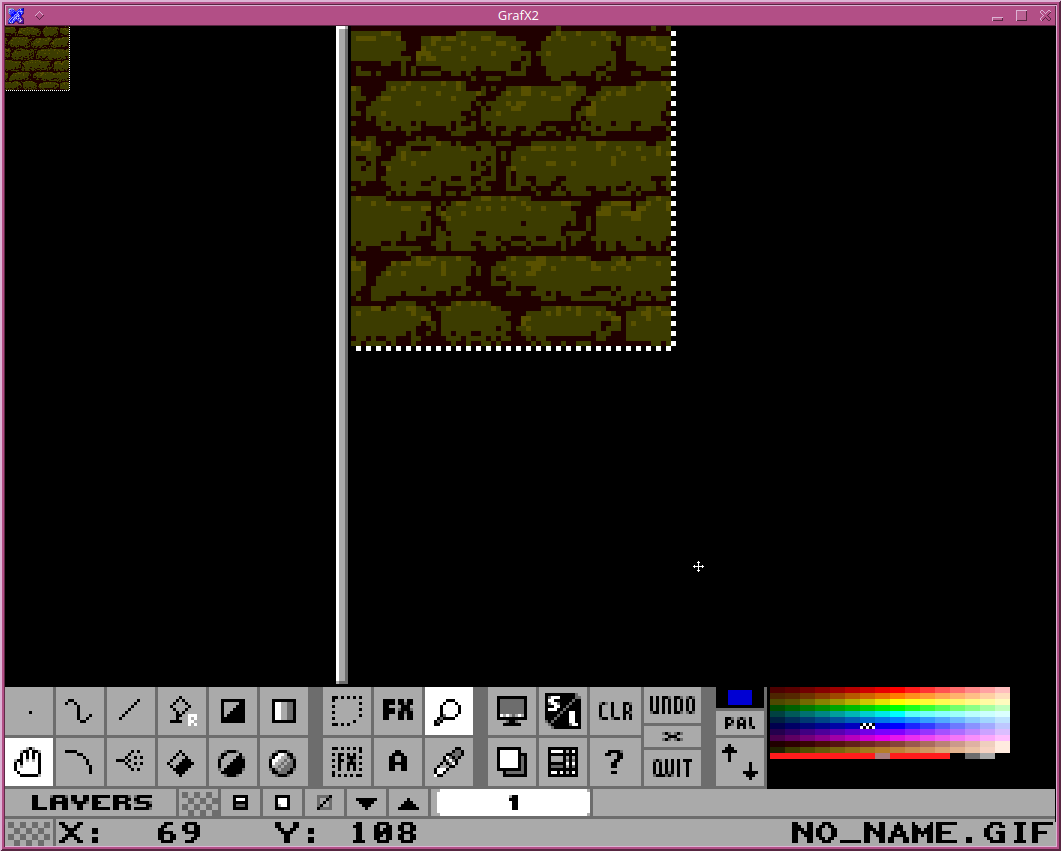
How to make a decent Tetris game. Part One - Making some blocks. This tutorial is half created to help Garand, but also because I'm sick of playing rubbish Tetris clones. Everyone knows that "Gameboy Tetris" was the best one going, but no-one ever seems to make them like that anymore. So here's a list of things you'll need in order to make the game well, as well as chunks of code, and a few moans and gripes along the way. I'll be doing this in Blitz, but the rules are about the same for all languages, and you should be able to follow them along with whichever language you're using. (maybe! Although it is a bit of a mess! I'm not very good at describing code!) Graphics To make a decent Tetris game, don't just use tiles. For the mostpart, Gameboy Tetris did, but it also had these.  As you can see, the I block doesn't have 4 seperate tiles, and instead uses a single entity. (or rather, 4 tiles that fit together neatly to make a nicer block.) We'll want to reproduce that. If we're aiming for a 800x600 resolution, we can easily fit a grid of 32x32 pixel tiles onto the screen, so we'll aim for that, too. Open up your image editor of choice, and start off with a 128x128 pixel image. Drag a rectangle from 0,0 to 96,96, leaving the bottom and right alone. Pick a color, fill the rectangle and then inside the rectangle, use your editor's Bevel tool to create a nice square 3D chunk. Do the same for the bottom right 32x32 pixels, and then again for the two leftover rectangles on the bottom and the right. If you view this with a 32x32 grid, you'll notice that we've created pretty much all the blocks you'll need for a good tetris game.  It's not perfect, since the "inner" corners of some tiles won't quite work. But it works enough for now. Once you've decided on which colors go on which tiles, you can head back in and tweak the bricks to look Just Right. So, recolor the tiles or make some nice patterns, and save 7 versions, since there's 7 different tetris blocks. They are.. I, J, L, T, Z, S, O Our next step would be to define those blocks. Block Data (This bit's messy! Try to keep up!) Start off with something like this. In these boxes we'll be placing our blocks. Each block has 4 rotations, hence the 4 boxes, and we'll want 7 of these, 4 rotations for each block. So, for the first block, we'll do the square. Looks like fun! Lots of letters! The capital letter symbolises our rotation point. When we hit the rotate button, the capital letter should be strapped to our current player's x,y co-ordinate. For the square, it won't really matter, but for other shapes it's use will become apparent. The letters also symbolise which tile to use from the grid we drew above, using the following object list. The player's x,y co-ordinates play in a realistic manner. Hit left or right and the player's x moves left and right. The Y slowly drops unless you hit Down. Remember : If you hit the rotate button, the player's x,y doesn't move.. Only the brick pattern changes. Here's the rest of the bricks. Now we need to be able to grab those pieces of data, stick them together into arrays. You'll want to hold X and Y co-ords for each tile in the block, as well as the tile's image number, too. First go through the list, storing all those X,Y co-ords as they are in the list. So, for the first square block, the 4 co-ords you hold will be.. 2,2 : 2,3 : 3,2 : 3,3 Next you take the position of the capital letter (3,3) and subtract it from all the co-ords, leaving you with.. -1,-1 : -1,0 : 0,-1 : 0,0 Now, whenever you draw the block onscreen, you use the player's location and add those co-ords, to get the position of each tile. Still following? Good! So, the array.. Each piece in the array has the following 3 bits of info. Block #, Each block numbered 1-7. Tile #, Each tile of the block, numbered 1-4. Rotation #, 4 rotations, 1-4. And we want 3 arrays, BlockX, BlockY for the co-ords and BlockN for the tile's image number. (Yes.. We could do this with Types, but it's just quicker to flick through an array to find all these bits.) Dim BlockX(7,4,4), BlockY(7,4,4), BlockN(7,4,4) Because we've set our data horizontally, we'll also need to make use of a couple of extra arrays whilst going through our list. Each array will hold 4 bits of data, one for each rotation of the block. First we need a count for each block, to keep track of which tile number we're up to, and then two more for the position of the capital lettered tile. (our offset) Dim count(4), ox(4), oy(4) Next up, our loop! We'll do a large loop counting through each block, for b=1 to 7. First in our loop we need to clear the count, ox and oy arrays, so they're ready for our new blockset. Once you've done that, start a loop to read through the data. Loop through the y lines, inside that loop through the 4 rotations, read the chunk of data, and from that grab each chr using a Mid$() statement. if the chr is a letter, add 1 to count, dump the tile number into the array, and if it's a capital letter stick it's position into ox and oy. Once you've gone through all 4 y lines, do a second loop through the 4 rotations and 4 tiles, shifting all the positions based upon their ox and oy's. Sounds garbled! So, hopefully the code should be easier to follow! If you're still baffled, read through that again. You'll get it after the 8th attempt  Basic Test Now we have our data, lets try making a nice simple testbed to ensure we've got everything going so far. Load in your 7 anim images into a nicely named array, image_Block. or iBlock(7) for short. Create a simple loop, with the usual repeat, cls, flip, until keydown(1) Give ourselves PlayerX, PlayerY, PlayerBlock and PlayerRotation variables to play with, set them up as random if you like. Next throw in some controls so we can shuffle the block around on the screen. Cursors to move, Z/X to rotate and A/S to switch through the blocks. To draw the block we need to flip through the 4 tiles, draw them at PlayerX+BlockX and PlayerY+BlockY, and using tile BlockN and image PlayerBlock! or.. If you managed to piece all that together in the right order, you should now have a nice looking testbed, with a moveable piece. Download things up to this point At this point, you might want to head into the graphics and try to fix those inner corners, so they look right for all the different tiles. Once you're all nicely prepared, you can either carry on from this point on your own, or head over to part 2, where we learn to make a proper tetris playfield. |
|
|
|
|
Comments |
|
|
| |||
|
| ||||